Here’s a detailed breakdown of Cloudflare Tunnel (formerly known as Argo Tunnel):
1. What is Cloudflare Tunnel?
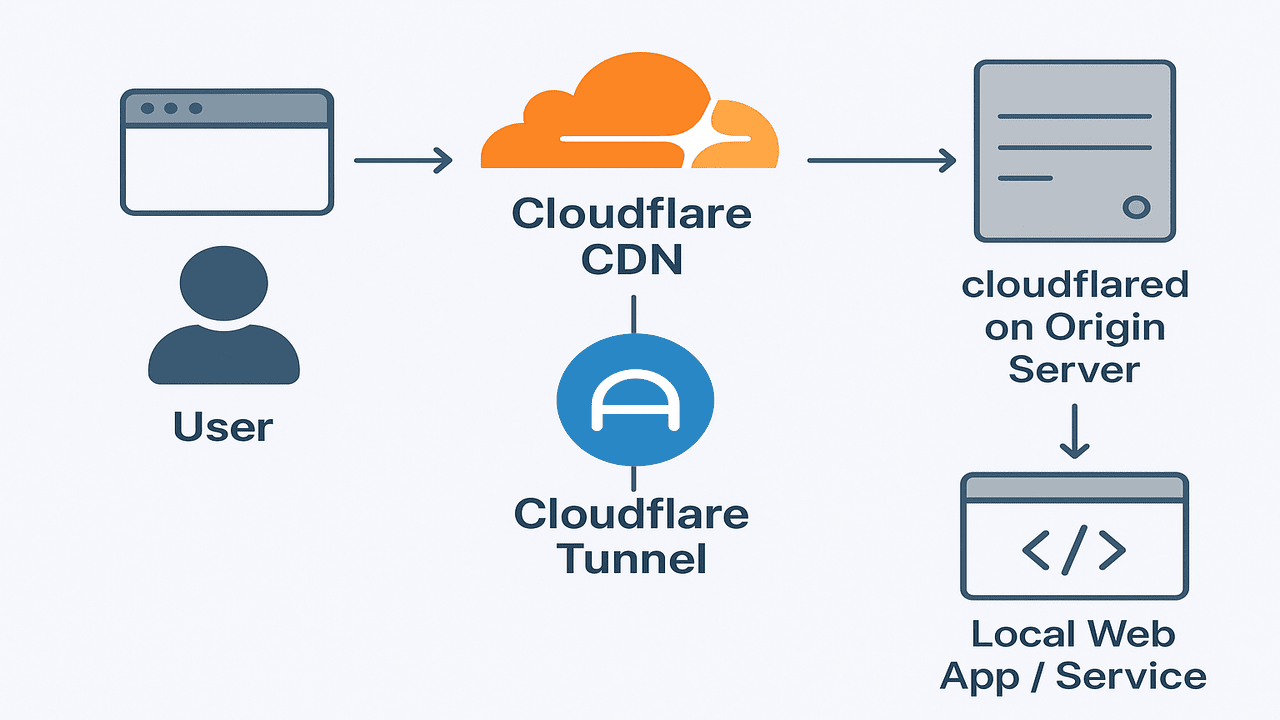
Cloudflare Tunnel is a service that allows you to securely expose a local web server, application, or service to the internet without opening any inbound ports on your firewall or router. Essentially, it creates a secure outbound connection from your server to Cloudflare's network, and Cloudflare acts as a proxy, routing external traffic to your local service.
This is particularly useful for:
- Hosting web applications behind NAT or firewalls.
- Avoiding direct exposure of your server to the internet.
- Simplifying SSL/TLS management since Cloudflare can handle HTTPS termination.
- Secure remote access to internal applications.
2. How it Works
- Install
cloudflaredon your server. - Authenticate with Cloudflare to link your tunnel to your Cloudflare account and domain.
- Run a tunnel, which establishes an outbound connection to Cloudflare's edge network.
- Cloudflare routes traffic from your domain (or a subdomain) to your local server through this tunnel.
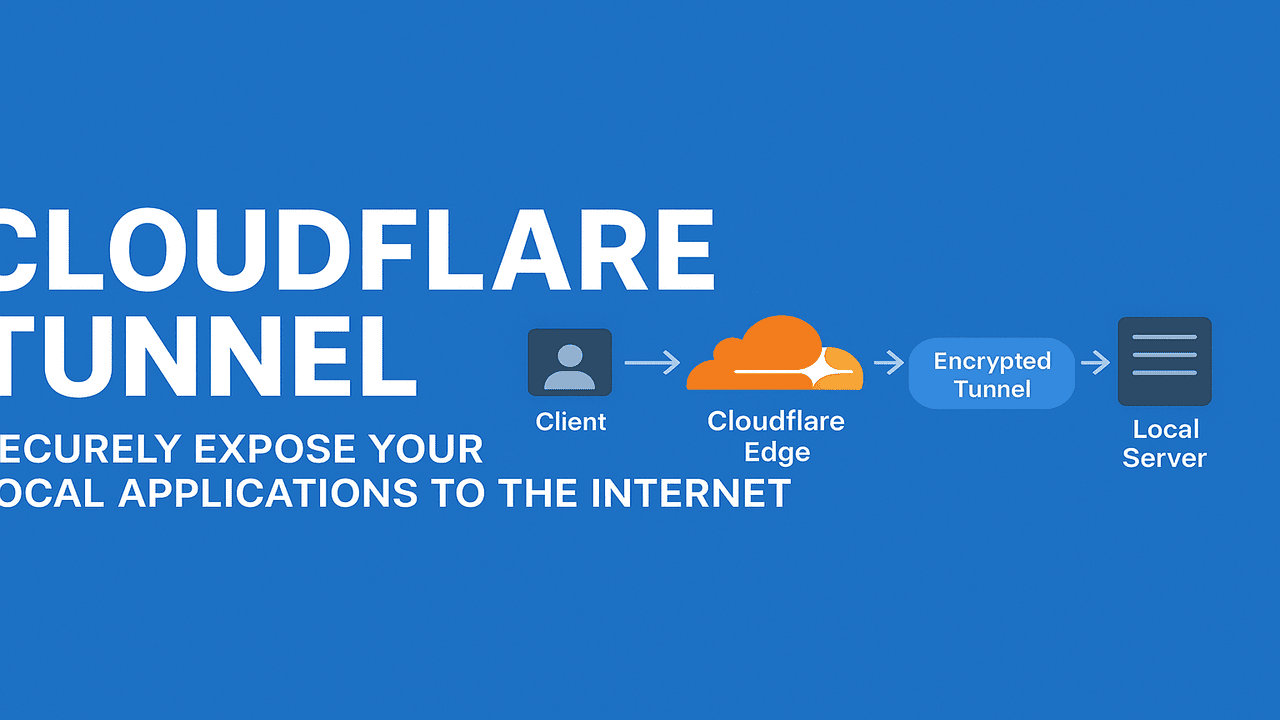
Architecture Overview:
Client ---> Cloudflare Edge ---> Encrypted Tunnel ---> Your Local Server
- Client: The end-user trying to access your application.
- Cloudflare Edge: Cloudflare's network that provides DDoS protection, caching, and SSL.
- Encrypted Tunnel: Outbound secure connection from
cloudflaredto Cloudflare. - Local Server: Your application running on a local or private network.
3. Key Features
- Zero open inbound ports: You don’t need to expose ports like 80 or 443.
- Automatic TLS: Cloudflare provides HTTPS even if your local server doesn’t.
- Load balancing and failover: Multiple tunnels can be configured for redundancy.
- Access control: Integrate with Cloudflare Access to require login before reaching your service.
- Private networks: Can be used to expose internal services only to authenticated users.
4. Installation and Basic Usage
Step 1: Install cloudflared
On Ubuntu/Debian:
sudo apt install cloudflared
Step 2: Authenticate
cloudflared login
Opens a browser to authenticate your Cloudflare account.
Select the domain you want to use.
Step 3: Create a Tunnel
cloudflared tunnel create my-tunnel
Creates a tunnel with a unique UUID.
Generates a credentials file in ~/.cloudflared/.
Step 4: Route Traffic
cloudflared tunnel route dns my-tunnel example.com
Maps the tunnel to a DNS record (e.g., example.com or app.example.com).
Step 5: Run the Tunnel
cloudflared tunnel run my-tunnel
Your local service is now accessible via the configured domain through Cloudflare.
5. Advanced Use Cases
- Secure internal apps: Access tools like Grafana, Jenkins, or internal dashboards without exposing them publicly.
- IoT and remote devices: Connect devices in private networks securely without port forwarding.
- Development environments: Expose local dev servers to clients or teams temporarily.
- Multi-service routing: Tunnel multiple services and route them via different subdomains using a single tunnel.
6. Benefits
- Security: No need to open ports; Cloudflare protects against attacks.
- Convenience: Works behind NAT or corporate firewalls.
- Scalability: Use Cloudflare’s network to handle traffic spikes.
- Integration: Works seamlessly with Cloudflare Access for identity-based authentication.
7. Considerations
- Requires a Cloudflare account and domain.
- Cloudflare tunnel is outbound; if your server needs to initiate connections from the internet, other methods are needed.
- Latency may slightly increase depending on geographic proximity to Cloudflare edge nodes.