
1. Introduction: The Silent Node Killer
Kubernetes is a master at packing workloads onto nodes, but what happens when a node runs out of memory? Pods start crashing, applications become slow, and if you're unlucky, your most critical service might be the one that gets killed.
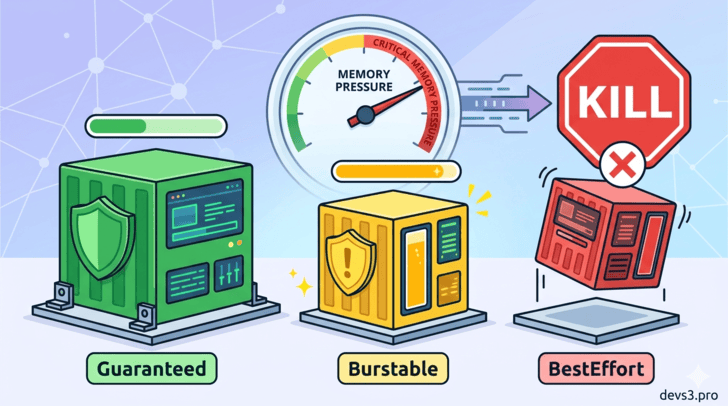
Not all pods suffer equally. Kubernetes uses Quality of Service (QoS) Classes to decide which pods are protected and which are sacrificed first when memory pressure hits.
In this article, we’ll go step by step through:
- What QoS classes are and how they are assigned
- Which pods die first (and last)
- How eviction actually works under the hood
- Practical SRE advice to keep your apps alive
2. What Are QoS Classes?
When the kubelet (the node agent) detects low memory, it must evict some pods to free up resources. QoS classes are Kubernetes’ way of ranking pods by importance.
There are exactly three QoS classes:
Class			Priority				Memory Request		Memory Limit
Guaranteed		Highest (last to die)	Set					Set (equal to request)
Burstable		Medium					Set					Set (higher than request) or not set
BestEffort		Lowest (first to die)	Not set				Not set
💡 Key insight: The class is automatically assigned by Kubernetes based on the pod’s resource requests/limits. You never write
qosClass: Guaranteedin YAML.
3. Detailed Breakdown of Each QoS Class
✅ Guaranteed – The Protected Class
How to get it:
- Every container in the pod must have both
requestsandlimitsset for memory and CPU. - The
requestandlimitmust be equal for each resource.
Example:
resources:
  requests:
    memory: "512Mi"
    cpu: "500m"
  limits:
    memory: "512Mi"
    cpu: "500m"
Behavior:
- Kubernetes considers these pods “critical” – they are almost never evicted due to memory pressure.
- They can still be OOM-killed if they exceed their own
limit.
🟡 Burstable – The Middle Child
How to get it:
- At least one container has
requestsandlimitsset, but they are not equal (or some container has a request but no limit, or vice‑versa).
Example:
resources:
  requests:
    memory: "256Mi"
  limits:
    memory: "1Gi"
Behavior:
- Burstable pods get a moderate priority. They can use extra memory when available, but during pressure they will be evicted before Guaranteed pods, but after BestEffort pods.
- Within the Burstable class, the pod that uses the highest percentage of its request is killed first.
🔴 BestEffort – The First to Go
How to get it:
- No container in the pod has any
requestsorlimitsset for memory or CPU.
Example:
resources: {}Behavior:
- These pods have the lowest QoS priority.
- When memory runs low, they are the first candidates for eviction.
- They also get no CPU guarantees – they only run when other pods are idle.
4. Step-by-Step: How Eviction Actually Happens
Let’s simulate a node with 8 GB memory.
Step 1 – Pods are scheduled
Pod		QoS Class		Request		Limit		Actual Usage
db		Guaranteed		4 GB		4 GB		3.8 GB
api		Burstable		2 GB		6 GB		5.5 GB
log		BestEffort		none		none		1 GB
Total request = 6 GB (well under 8 GB). Total actual usage = 10.3 GB – node is overcommitted!
Step 2 – Memory pressure detected
Kubelet monitors memory usage. When available memory falls below a threshold (e.g., 100 MiB), eviction begins.
Step 3 – Eviction order (strict per class)
- BestEffort –
logpod gets evicted first. - If memory is still low, the kubelet looks at Burstable pods and evicts the one with the highest
usage/requestratio. Here,api(5.5 GB / 2 GB = 275%) goes next. - Guaranteed pods are almost never evicted due to node pressure – only if they exceed their own limit (OOM) or if system processes need memory.
Step 4 – Pod is terminated
The pod receives a SIGTERM, then after a grace period (default 30s), SIGKILL. Its resources are freed.
5. OOM Killer vs. Kubelet Eviction – A Common Confusion
Mechanism			Who triggers			Target					When
Kubelet eviction	Kubelet					Whole pods based on QoS	Before memory is completely exhausted
OOM Killer			Linux kernel			Individual containers	When a container exceeds its memory limit
🚨 Important: Even a Guaranteed pod can be OOM-killed if it uses more than its own
limit. QoS only protects against node‑level memory pressure.
6. SRE Best Practices (How to Not Get Your Pods Killed)
✅ For critical workloads (databases, control planes)
- Set
requests=limitsfor both memory and CPU → Guaranteed class. - Always leave some headroom: don't set
memory.limittoo close to node capacity.
⚠️ For burstable workloads (APIs, batch jobs)
- Set a reasonable
request(baseline usage) and a higherlimit(max burst). - Monitor the
usage/requestratio – if it's constantly >80%, increase the request.
❌ Never run production workloads as BestEffort
- No requests/limits means your pod can be killed at any moment.
- Also, BestEffort pods are first to be throttled on CPU.
🔧 Use kubectl describe pod to check QoS
$ kubectl describe pod my-pod
...
QoS Class: Burstable
7. Real-World Example: The Traffic Spike That Killed the Wrong Pod
A fintech company ran a payment gateway as Burstable (request 1GB, limit 4GB) and a logging sidecar as BestEffort. During a Black Friday spike, memory ran low. Kubernetes evicted the BestEffort logger first – fine. But memory was still low, so it evicted the Burstable payment gateway – disaster.
Fix: Move the payment gateway to Guaranteed (request=limit=4GB) and give the logger a small BestEffort is fine (it can be restarted).
8. Summary Table – Who Dies First?
QoS Class			Eviction Order					Protection Level
BestEffort			1st								None
Burstable			2nd (by highest usage/request)	Medium
Guaranteed			3rd (practically never)			High
9. Final Word
Kubernetes QoS is not just a theoretical concept – it directly determines which pod disappears when things go wrong. By understanding and correctly setting resource requests and limits, you can ensure that your critical applications survive memory pressure, while non‑essential workloads are sacrificed first.
Remember:
📌 requests = reservation
📌 limits = maximum allowed
📌 QoS class = automatic, but you control it through those values.