
Introduction
Before writing your first line of C# code, you need a proper .NET development environment. A clean setup saves hours of debugging and frustration later.
In this article, you’ll learn:
- How to install .NET 8 SDK
- Which IDE to choose (Visual Studio vs VS Code)
- How to verify your installation
- Create and run your first .NET application
This guide works on Windows, Linux, and macOS.
What You Need Before Starting
Minimum Requirements
- 8 GB RAM (recommended)
- 10 GB free disk space
- Internet connection
Supported Operating Systems
- Windows 10 / 11
- Ubuntu 20.04+
- macOS Monterey+
Step 1: Install .NET 8 SDK
The SDK (Software Development Kit) includes everything needed to:
- Build
- Run
- Test
- Publish .NET applications
🔹 Windows
- Go to the official .NET website
- Download .NET 8 SDK (LTS)
- Run installer → Next → Install
✔ Automatically added to PATH
🔹 Linux (Ubuntu)
sudo apt update
sudo apt install dotnet-sdk-8.0
Verify:
dotnet --version
🔹 macOS
Using Homebrew:
brew install --cask dotnet-sdk
Verify:
dotnet --version
Step 2: Choose Your Code Editor / IDE
🟦 Option 1: Visual Studio (Recommended for Beginners)
Best for:
- Beginners
- Large projects
- Drag & drop UI tools
Features
- IntelliSense
- Built-in debugger
- Project templates
✔ Best choice on Windows
🟨 Option 2: Visual Studio Code (Lightweight)
Best for:
- Cross-platform developers
- API & backend developers
- Minimal setup lovers
Required Extensions
- C#
- C# Dev Kit
- .NET Install Tool
✔ Works on Windows, Linux, macOS
Step 3: Verify .NET Installation
Open terminal or command prompt and run:
dotnet --info
You should see:
- .NET SDK version 8.x
- Runtime installed
- OS details
If this command works → 🎉 Your setup is successful
Step 4: Create Your First .NET Project
Let’s create a simple console app.
dotnet new console -n HelloDotNet
cd HelloDotNet
dotnet run
Output:
Hello, World!
🎉 Congratulations! You just ran your first .NET app.
Step 5: Understanding Project Structure
Inside your project folder:
HelloDotNet/
│── Program.cs
│── HelloDotNet.csproj
│── bin/
│── obj/
Important Files
- Program.cs → Entry point
- .csproj → Project configuration
- bin/ → Compiled output
- obj/ → Temporary build files
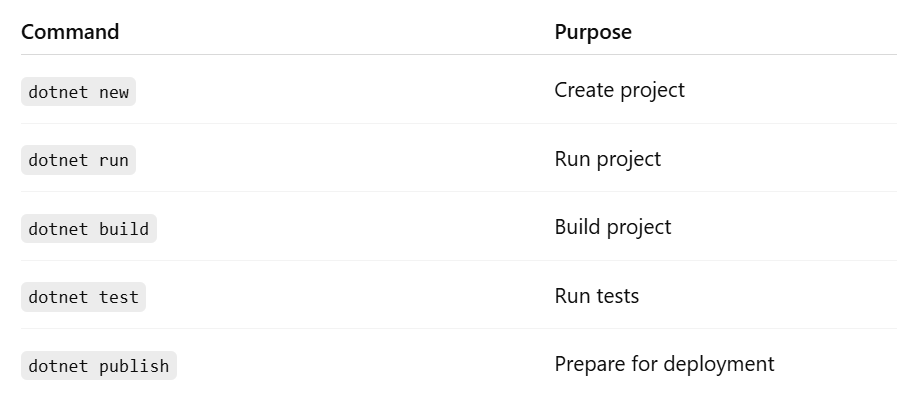
Step 6: Useful .NET CLI Commands
Common Setup Problems & Fixes
❌ dotnet command not found
✔ Restart terminal
✔ Check PATH variable
✔ Reinstall SDK
❌ Wrong SDK version
✔ Run:
dotnet --list-sdks
✔ Remove old versions if needed
Best Practices for Beginners
✅ Always use LTS version
✅ Learn CLI early
✅ Use Git from day one
✅ Keep SDK updated
What You’ve Learned
✔ Installed .NET 8 SDK
✔ Set up IDE
✔ Created & ran your first app
✔ Learned project structure
You are now ready to write real .NET applications.